Installation
The MCP server needs tokens to access your LinkedIn account. Here's how to get them:
- Sign up at Linked API Platform.
- Choose your plan and start your 7-day free trial.
- Connect your LinkedIn account (it takes about 2 minutes).
- Copy your tokens from the dashboard (as shown below):
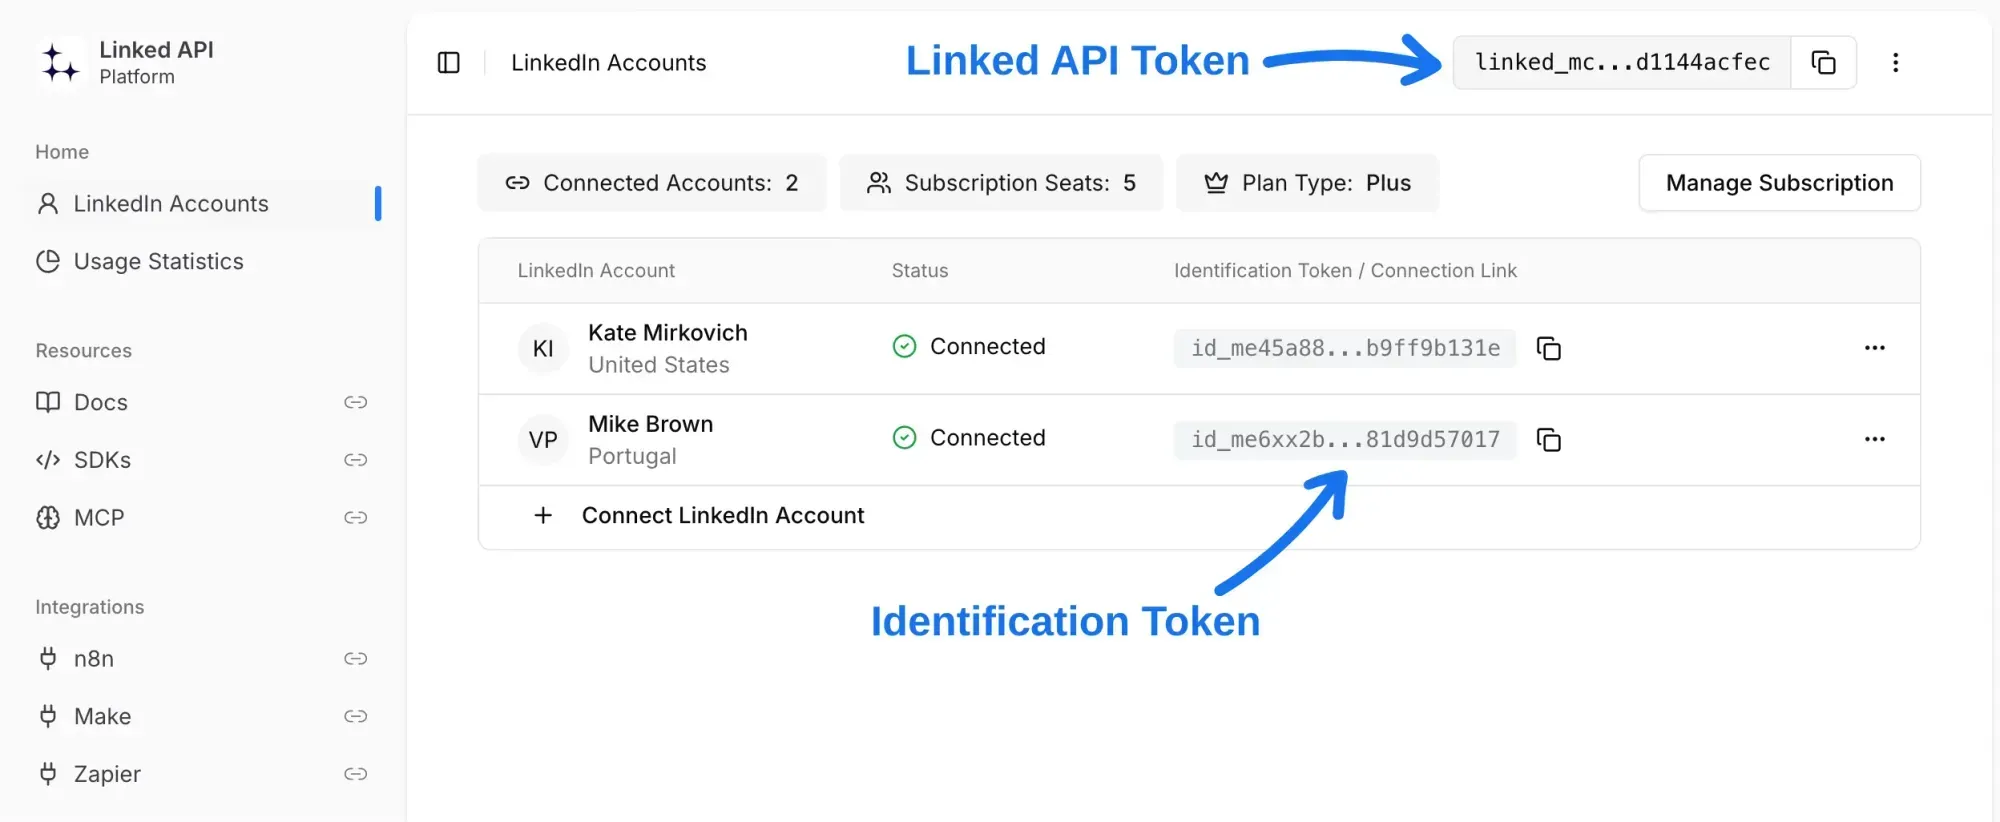
Multiple LinkedIn accounts:
If you have multiple LinkedIn accounts, you'll get a separate identification token for each one, and you can create multiple MCP server instances – one for each account.
Claude
To connect Linked API to Claude, you'll need to add it as a custom connector:
- Open Claude's settings.
- Navigate to the "Connectors" section.
- Click on "Add custom connector".
- In the URL field, paste this link (replace with your actual tokens):
https://mcp.linkedapi.io?linked-api-token={YOUR_LINKED_API_TOKEN}&identification-token={YOUR_IDENTIFICATION_TOKEN}&client=claudeThis works for both claude.ai and the Claude Desktop app. Connectors sync across both.
Claude Desktop
If you prefer running the MCP server locally instead of using the connector above, add this to your Claude Desktop config file:
- macOS:
~/Library/Application Support/Claude/claude_desktop_config.json - Windows:
%APPDATA%\Claude\claude_desktop_config.json
{
  "mcpServers": {
    "linkedapi": {
      "command": "npx",
      "args": ["-y", "@linkedapi/mcp"],
      "env": {
        "LINKED_API_TOKEN": "{YOUR_LINKED_API_TOKEN}",
        "IDENTIFICATION_TOKEN": "{YOUR_IDENTIFICATION_TOKEN}"
      }
    }
  }
}
Restart Claude Desktop after saving.
Claude Code
Add the remote MCP server with a single command:
claude mcp add linkedapi \
  --transport http \
  "https://mcp.linkedapi.io?linked-api-token={YOUR_LINKED_API_TOKEN}&identification-token={YOUR_IDENTIFICATION_TOKEN}&client=claude-code"
Or add it locally via NPX:
claude mcp add linkedapi \
  -e LINKED_API_TOKEN={YOUR_LINKED_API_TOKEN} \
  -e IDENTIFICATION_TOKEN={YOUR_IDENTIFICATION_TOKEN} \
  -- npx -y @linkedapi/mcp
Tip: For Claude Code, you may find it more convenient to use our LinkedIn CLI or Agent Skills instead of MCP – they provide a more native integration with the agentic coding workflow.
ChatGPT
To connect Linked API to ChatGPT, you'll need to add it as a connector:
- Navigate to your ChatGPT settings.
- Find the "Connectors" section.
- Click on "Add connector".
- In the URL field, paste this link (replace with your actual tokens):
https://mcp.linkedapi.io?linked-api-token={YOUR_LINKED_API_TOKEN}&identification-token={YOUR_IDENTIFICATION_TOKEN}&client=chatgptCodex
Add the MCP server to your Codex config file at ~/.codex/config.toml:
[mcp_servers.linkedapi]
url = "https://mcp.linkedapi.io?linked-api-token={YOUR_LINKED_API_TOKEN}&identification-token={YOUR_IDENTIFICATION_TOKEN}&client=codex"
Or add it via CLI:
codex mcp add linkedapi \
  --url "https://mcp.linkedapi.io?linked-api-token={YOUR_LINKED_API_TOKEN}&identification-token={YOUR_IDENTIFICATION_TOKEN}&client=codex"
Tip: For Codex, you may find it more convenient to use our LinkedIn CLI instead of MCP – it gives you shell-native LinkedIn commands that work naturally in any terminal-based agent.
Cursor
To connect Linked API to Cursor, follow these steps:
- Navigate to "Cursor Settings" > "Tools & MCP".
- Click the "+ Add New MCP Server" button.
- Paste the following configuration:
{
  "mcpServers": {
    "linkedapi": {
      "url": "https://mcp.linkedapi.io?linked-api-token={YOUR_LINKED_API_TOKEN}&identification-token={YOUR_IDENTIFICATION_TOKEN}&client=cursor"
    }
  }
}
You can also add this to .cursor/mcp.json in your project root for project-level configuration.
VS Code
VS Code has built-in MCP support (no extension required). Add a .vscode/mcp.json file to your project:
{
  "servers": {
    "linkedapi": {
      "type": "http",
      "url": "https://mcp.linkedapi.io?linked-api-token={YOUR_LINKED_API_TOKEN}&identification-token={YOUR_IDENTIFICATION_TOKEN}&client=vscode"
    }
  }
}
Alternatively, add it to your settings.json:
{
  "mcp": {
    "servers": {
      "linkedapi": {
        "type": "http",
        "url": "https://mcp.linkedapi.io?linked-api-token={YOUR_LINKED_API_TOKEN}&identification-token={YOUR_IDENTIFICATION_TOKEN}&client=vscode"
      }
    }
  }
}
Windsurf
Add this to your Windsurf configuration file at ~/.codeium/windsurf/mcp_config.json:
{
  "mcpServers": {
    "linkedapi": {
      "serverUrl": "https://mcp.linkedapi.io?linked-api-token={YOUR_LINKED_API_TOKEN}&identification-token={YOUR_IDENTIFICATION_TOKEN}&client=windsurf"
    }
  }
}
You can also configure it through the UI: open the Cascade panel, click the tools icon, then click "Configure" to edit the configuration file.
Local installation
For clients that support local MCP servers, you can run Linked API MCP server directly on your device using NPX:
{
  "mcpServers": {
    "linkedapi": {
      "command": "npx",
      "args": ["-y", "@linkedapi/mcp"],
      "env": {
        "LINKED_API_TOKEN": "{YOUR_LINKED_API_TOKEN}",
        "IDENTIFICATION_TOKEN": "{YOUR_IDENTIFICATION_TOKEN}"
      }
    }
  }
}