
How to Automate LinkedIn Messages (2026): The LinkedIn Messaging API, What's Safe, and the Flow in Code
If you send the same LinkedIn connection requests and follow-up messages by hand every week, you have already hit the ceiling: it does not scale, and copy-pasting into the message box is exactly the work a computer should do. This guide covers what you can automate on LinkedIn, the safe ways to do it, and – for teams who want it wired into their own product or CRM – the exact connect-to-reply flow in code.
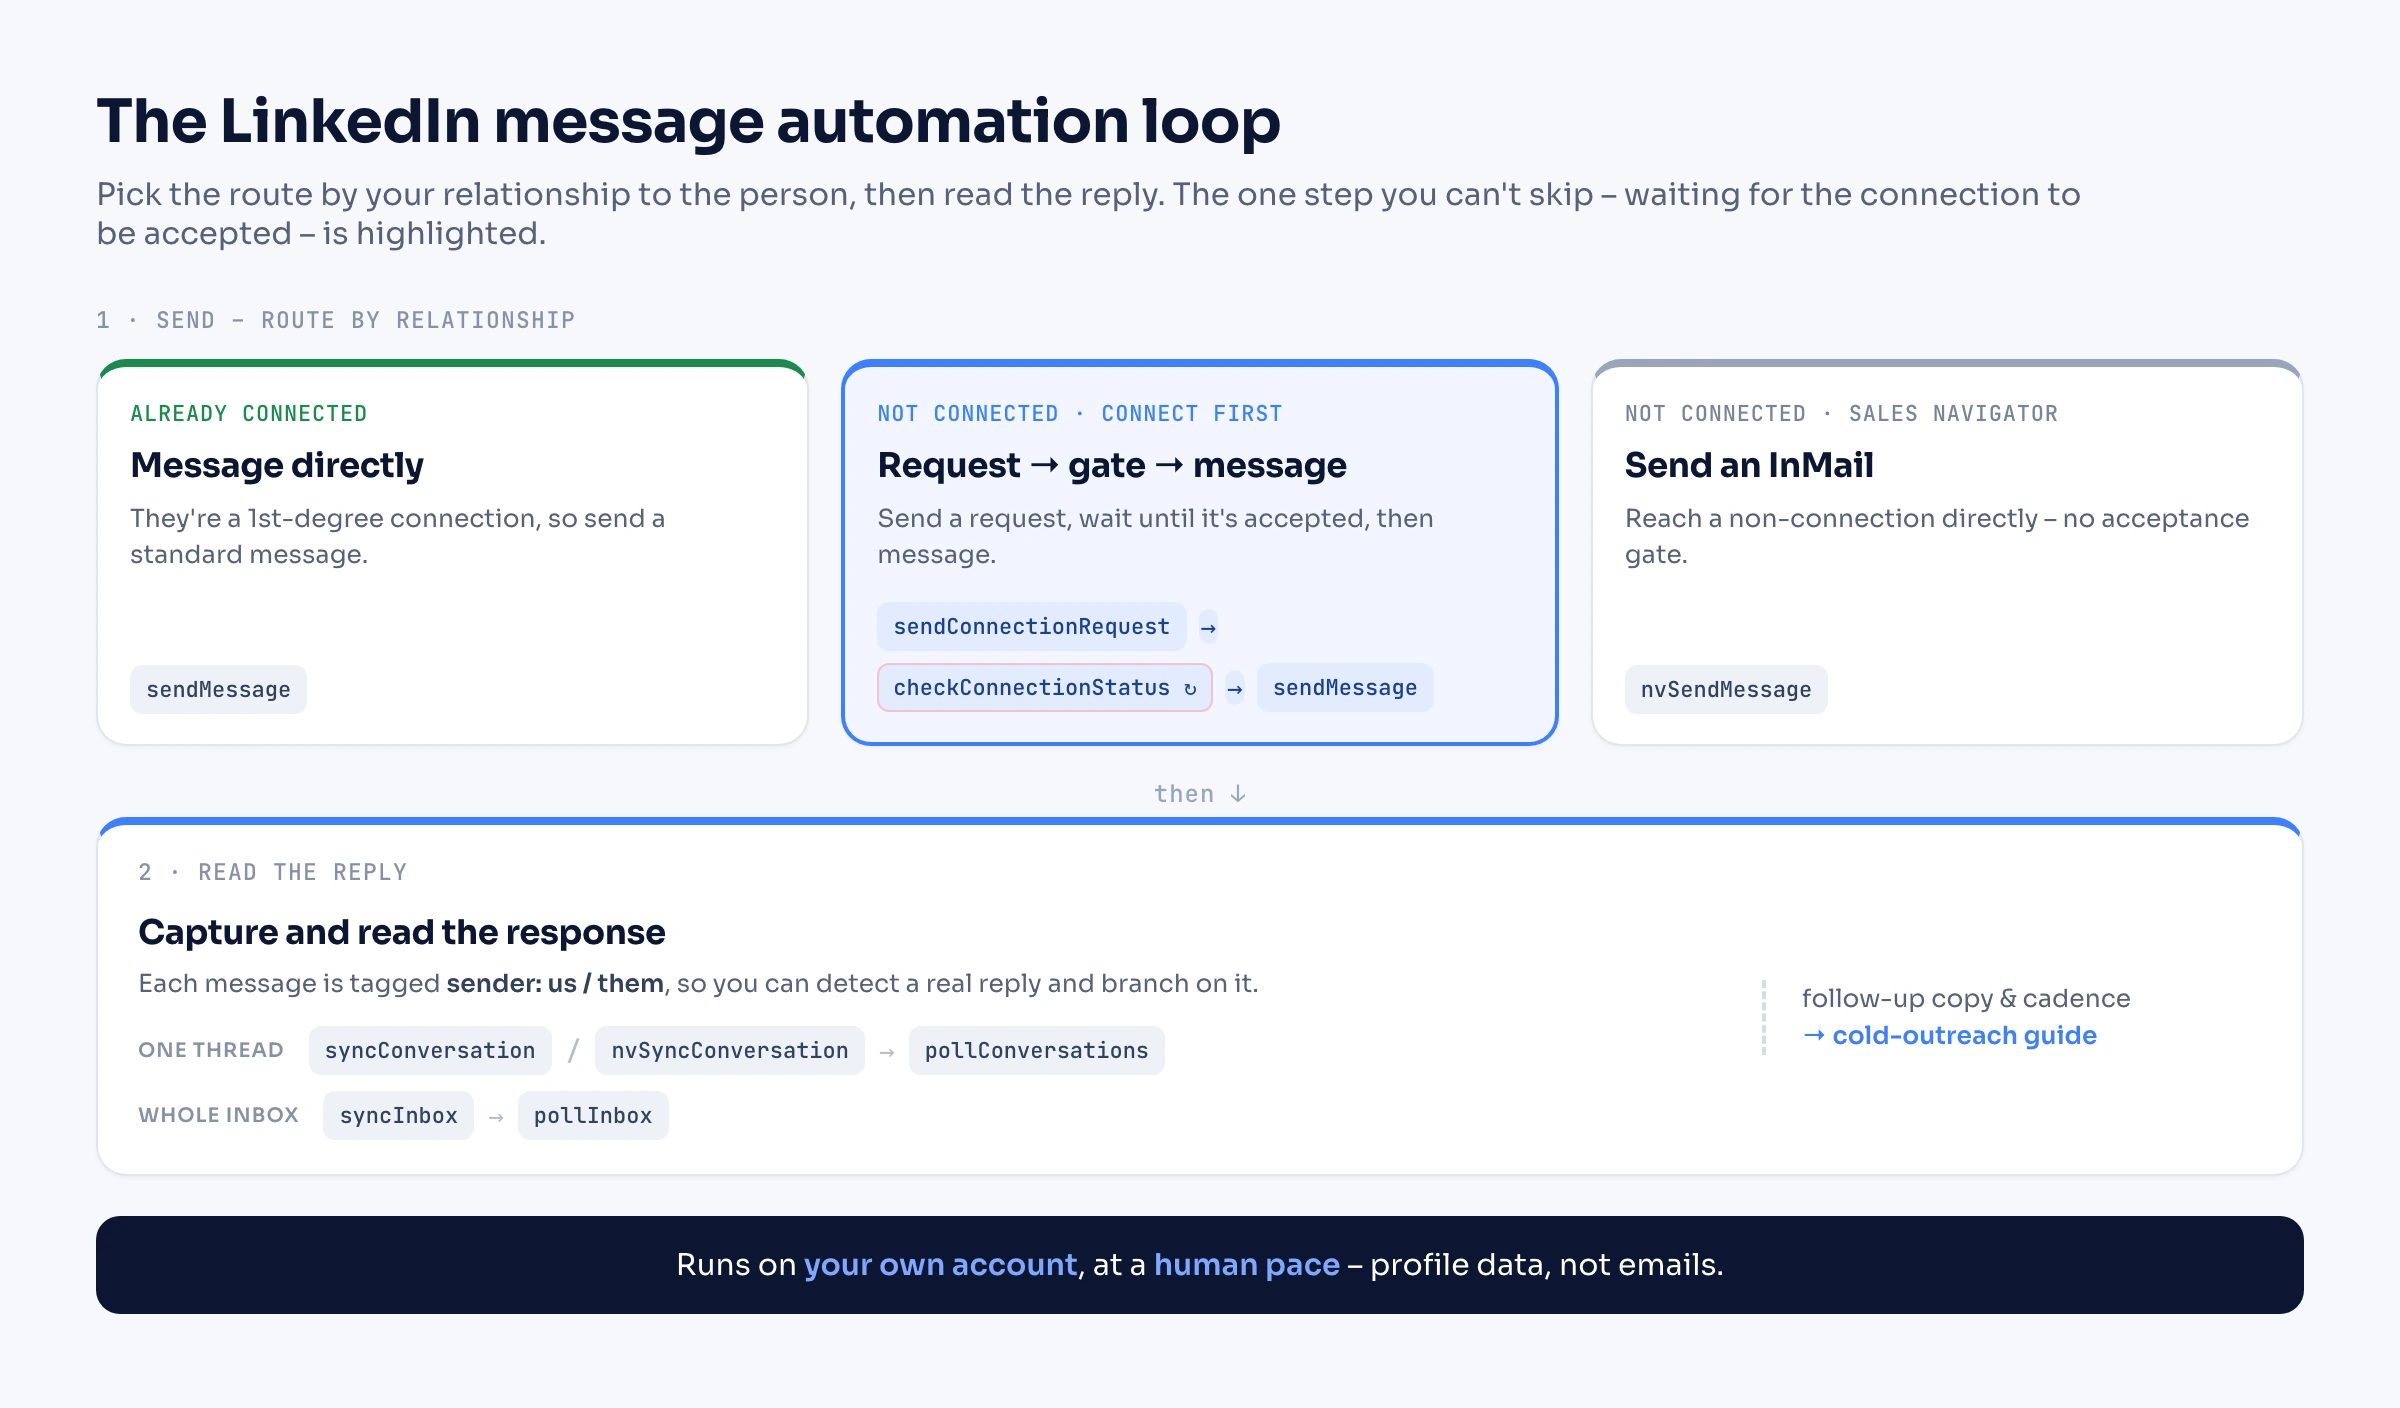
The short version. Standard LinkedIn messaging has no native way to schedule or sequence outbound DMs (LinkedIn documents scheduled outreach only for its paid recruiting tools – Recruiter and Recruiter Lite can schedule initial InMail, and Recruiter alone can schedule one automated follow-up; Premium's away message is just an auto-reply), so automating everyday outreach means a tool or an API acting on your own account. The real automation is a branching loop: if you are already connected, send a message; if not, either send a connection request → wait until it is accepted → message, or use Sales Navigator InMail to reach a non-connection directly. Then read the reply, or monitor your whole inbox for incoming messages at scale. Keep it on your own account, at a human pace, within LinkedIn's limits.
Is there a LinkedIn messaging API?
Yes, but it is not a general developer product. LinkedIn documents two official messaging surfaces, both gated behind partner approval, and neither one lets you schedule or sequence outbound DMs.
| Official surface | What it does | Who can use it |
|---|---|---|
| Messages API | Creates a message to one or more first-degree connections, or replies in an existing thread | Approved partners only, under an API agreement |
| Pages messaging integration | Sends and receives messages in a Company Page's inbox – not your personal DMs | Page admins, through six approved platforms: Hootsuite, Sprinklr, Oktopost, Brandwatch, Zoho Recruit, Bird CRM |
The Messages API documentation opens on the access rule: "Usage of this API is restricted to approved partners, subject to limitations via API agreement."
Approval on its own would still not buy you automation, because the same page rules it out in the requirements: "A message must be associated with a specific member action. Member actions do not include an automated or scheduled event." LinkedIn further requires that the member can edit any pre-prepared draft, takes an affirmative action to send it, and that the message posts at or around the time of that action.
That leaves the account-level route for everyone else, and it is what the rest of this guide covers: Linked API's messaging actions – sendMessage and nvSendMessage, with inbox monitoring for reading replies and conversation history for earlier messages – run on your own account through a human-paced cloud browser rather than under a partner agreement.
Can you automate LinkedIn messages?
Yes – but for regular direct messages, not with a native LinkedIn button. LinkedIn's own Message content automation page is about inbound processing – how it renders and suggests replies to messages you receive – not about scheduling messages you send.
The one place LinkedIn documents scheduled outbound is its paid recruiting product: per LinkedIn's help center, you can schedule initial outreach InMail in Recruiter and Recruiter Lite, and schedule one automated follow-up InMail in Recruiter only. Everyday Messaging has no equivalent, and the Premium away message is an automatic reply shown to people who message you – not a way to send scheduled outreach.
So for standard outreach, "automating LinkedIn messages" means a tool or an API that performs the clicks and keystrokes on your own account. The rest of this guide is how to do that well.
The three ways to automate LinkedIn messages
There are three approaches, and the right one depends on how much control you need and whether you write code.
| Approach | How it runs | Best for | Honest trade-off |
|---|---|---|---|
| Browser (Chrome) extension | On your own computer, in your logged-in browser | Quick, occasional personal use | Only works while your machine and browser are on; more exposed than a cloud setup |
| Cloud no-code tool | On the vendor's cloud, on a schedule, through a visual campaign builder | Non-technical users running standard campaigns | A closed UI – you get the vendor's features, not your own logic; you live inside their product |
| API / code | You call an API from your own backend, on your own account | Teams embedding messaging in a product, CRM, or agent | You write a little code – in exchange you own the whole flow |
The first two are covered well elsewhere (see our roundup of LinkedIn automation tools for the "which tool" question). This guide focuses on the third, because it is the one no listicle actually shows you: the real flow, in code, on your own account.
What you can automate: messages, InMail, and connection notes
Before the code, get the routing right – who you can message depends on your relationship to them.
| Message type | Who it reaches | Method | Notes |
|---|---|---|---|
| Standard message | People you are already connected to (1st-degree) | sendMessage | Text up to 1,900 characters |
| Sales Navigator InMail | People you are not connected to | nvSendMessage | Needs a Sales Navigator seat and a subject line – credits and consumer mechanics in the InMail guide |
| Connection request + note | Someone you want to connect with | sendConnectionRequest | A single note field, not a sequence – automating the request itself is its own connection-requests guide |
Two honest boundaries that pages blurring "reach anyone instantly" skip: a standard message only works once someone is a 1st-degree connection, and reaching a non-connection means either connecting first or spending a Sales Navigator InMail. There is no button that DMs a stranger for free. If the 1st/2nd/3rd labels themselves are the part you want pinned down, degrees of connection covers what each one allows – and why the badge alone does not tell you what to do next.
How to automate the full flow (in code)
Here is the branching loop with Linked API, the LinkedIn automation API that runs these actions on your own account. Install the SDK (npm install -S @linkedapi/node or pip install linkedapi) and initialise the client with your tokens.
The core decision is the acceptance gate – the step generic messaging relays skip. You check where you stand, and only message a first-degree connection; if you are not connected, you get connected first and message after the request is accepted. Automating the connection request itself – sending it, handling the emailRequired edge, withdrawing stale invites, and detecting acceptance – is its own lifecycle, covered in How to Automate LinkedIn Connection Requests; here it is only the gate before a message.
import LinkedApi from '@linkedapi/node';

const linkedapi = new LinkedApi({
  linkedApiToken: process.env.LINKED_API_TOKEN,
  identificationToken: process.env.IDENTIFICATION_TOKEN,
});

const NOTE = 'Hi! I work on LinkedIn tooling and would love to connect.';

// Once per account, before any outreach: enable inbox monitoring so replies are
// captured (add nvSyncInbox for InMail replies). It only catches what arrives after.
const sync = await linkedapi.syncInbox.execute({});
await linkedapi.syncInbox.result(sync.workflowId);

async function reach(personUrl: string, text: string): Promise<void> {
  // 1. Where do we stand? -> connected | pending | notConnected
  const check = await linkedapi.checkConnectionStatus.execute({ personUrl });
  const { data } = await linkedapi.checkConnectionStatus.result(check.workflowId);

  // 2. Already connected -> message them directly.
  if (data?.connectionStatus === 'connected') {
    const sent = await linkedapi.sendMessage.execute({ personUrl, text });
    await linkedapi.sendMessage.result(sent.workflowId);
    return;
  }

  // 3. Not connected -> get connected first, then message once accepted.
  // Sending the request, the emailRequired edge, and withdrawing stale invites
  // are their own lifecycle: /guides/how-to-automate-linkedin-connection-requests
  if (data?.connectionStatus === 'notConnected') {
    await linkedapi.sendConnectionRequest.execute({ personUrl, note: NOTE });
    // Re-run checkConnectionStatus on a schedule (cron or webhook);
    // when it returns 'connected', call sendMessage. Do not busy-wait.
  }
}To reach someone you are not connected to without waiting, send a Sales Navigator InMail instead. This route has no acceptance gate, but it needs a Sales Navigator seat and a subject line – how InMail credits, refunds, and limits work is covered in the LinkedIn InMail guide.
const inmail = await linkedapi.nvSendMessage.execute({
  personUrl,
  subject: 'Quick question about your team',
  text: 'Hi Dana, saw your team is hiring SDRs. Mind if I share how we help?',
});
await linkedapi.nvSendMessage.result(inmail.workflowId);Finally, read the reply. Inbox monitoring, switched on with syncInbox at the top of the code before anything is sent, captures every new message from then on – including replies to InMail when you also run nvSyncInbox. Enable it first: a reply that arrives before monitoring is on is not captured. Then pollInbox with the person's personUrl returns the whole conversation with them, newest first, each message tagged with a sender of us or them, so you can detect a real response. Message times are whole minutes, so set since a few minutes before you sent your message, take the earliest us message in the result – the one you sent, not a later follow-up – and count a them message as the reply only if it is not earlier than that one. A standard message and a Sales Navigator InMail live in different threads, and type (st or nv) tells them apart. If you also need what was said before monitoring was enabled, load it once with syncConversation (or nvSyncConversation) – it then comes back in the same result.
// Later, on your schedule: everything with this person around and after your message.
// since is a few minutes before you sent it - message times are whole minutes.
const { data } = await linkedapi.pollInbox({ personUrl, type: 'st', since });
const messages = [...(data?.messages ?? [])].reverse();    // oldest first
const sent = messages.find((m) => m.sender === 'us');      // the message you sent
const reply = sent
  ? messages.find((m) => m.sender === 'them' && new Date(m.time) >= new Date(sent.time))
  : undefined;                                             // no `sent` yet: not known yet
console.log(reply?.text);

// InMail reply (Sales Navigator route): the same check with type 'nv'.
const inmail = await linkedapi.pollInbox({ personUrl, type: 'nv', since });Prefer the shell? The CLI runs the same flow, and the AI-agent surfaces – the MCP server and ready-made skills – expose it to Claude Code, Cursor, and Codex. If you are setting an agent up for the first time, how to give an AI agent access to LinkedIn covers the connection choices and the first-run sequence.
linkedin inbox sync                                                      # once per account, before any outreach
linkedin connection status https://www.linkedin.com/in/john-doe          # connected | pending | notConnected
linkedin connection send   https://www.linkedin.com/in/john-doe --note "Hi! Would love to connect."
linkedin message send      https://www.linkedin.com/in/john-doe "Thanks for connecting - quick question..."
linkedin navigator message send https://www.linkedin.com/in/john-doe "Hi..." --subject "Quick question"
linkedin inbox get --person https://www.linkedin.com/in/john-doe --json   # the whole conversation, replies included
Where this flow ends is deliberate: it gets a message sent and the reply back into your system. What the follow-up should say, and when to send it, is outreach strategy – see our guide to LinkedIn cold outreach for the copy, timing, and sequence design. For method-by-method reference, see the docs for sending messages, connection requests and invitations, checking connection status, and monitoring the inbox, or the SDK pages for sendMessage, nvSendMessage, sendConnectionRequest, checkConnectionStatus, syncInbox, pollInbox, and syncConversation.
Automate the whole inbox (monitor every reply)
The loop above reads a reply when you already know the person. To automate messaging at the inbox level – catch every incoming message across all your conversations, then route, tag, or reply to it – poll the whole inbox rather than one person at a time. Enable it once per account with syncInbox (or nvSyncInbox for the Sales Navigator inbox), then pollInbox returns every new message across every thread, each with a sender of us or them and two URLs for the other person: the hashed personHashedUrl, always present and what you reply to, and personPublicUrl, the public profile URL, which is null until that person has been resolved.
syncInbox only switches monitoring on and returns; the messages are picked up afterwards by a sync that runs periodically, so expect the first ones on the next sync rather than the moment the call resolves. One disclosure worth knowing: when that sync finds new messages in a thread – including messages you send yourself – it opens the profile page of the other person in that thread to resolve their public URL – but only when Linked API does not already know it, so a person is visited once rather than on every message. Those visits are made from your own account and are visible to the people whose profiles are opened. A person's personPublicUrl stays null until their thread produces a message.
// Enable whole-inbox monitoring once per account.
const sync = await linkedapi.syncInbox.execute({});
await linkedapi.syncInbox.result(sync.workflowId);

// Poll only what arrived since your last run, using a cursor you persist.
// Without `since`, pollInbox returns everything captured - so you would
// reprocess (and re-reply to) old messages on every run.
// `since` is inclusive and times are whole minutes, so the next run sees the newest
// minute again: keep the ids already handled at the cursor and skip them.
const { since, handledIds } = await loadCursor();  // your storage; { since: undefined, handledIds: [] } on first run
const { data } = await linkedapi.pollInbox({ type: 'st', since });
const messages = data?.messages ?? [];
for (const m of messages) {
  if (m.sender !== 'them' || handledIds.includes(m.id)) continue;  // new inbound only
  const reply = await linkedapi.sendMessage.execute({ personUrl: m.personHashedUrl, text: 'Thanks for the reply!' });
  await linkedapi.sendMessage.result(reply.workflowId);
}
// Advance the cursor to the newest message (pollInbox returns newest-first) and
// remember the ids at that time - the next run gets all of them again.
if (messages.length) {
  const newest = messages[0].time;
  const atNewest = messages.filter((m) => m.time === newest).map((m) => m.id);
  await saveCursor({ since: newest, handledIds: atNewest });
}On the shell it is linkedin inbox sync once (add --nv for the Sales Navigator inbox), then linkedin inbox get --since <timestamp>. Poll with an advancing since, or skip polling entirely and subscribe to inbox webhook events for push delivery. This stays the mechanics layer – detecting and retrieving the message; what an auto-reply should actually say still belongs to your outreach strategy.
LinkedIn message and connection limits (staying safe)
LinkedIn does not publish exact message or connection-request limits, so treat the numbers you see online as guardrails, not gospel, and expect them to move with your account's age and standing. Third-party trackers land in a similar ballpark. For connection requests, ZELIQ's 2026 automation guide suggests roughly 20-40 a day (100-200 a week), while PhantomBuster, as of its July 2026 update, puts free and Premium accounts nearer 100 a week. For direct messages, ZELIQ's 2026 guide suggests about 30-60 a day, and PhantomBuster, as of July 2026, cites roughly 100 a week on a free account and 150 on Premium – all unofficial observations, not published caps. Our own breakdowns of the connection request limit and LinkedIn's limits go deeper.
The safer way to automate is to stay well inside those bounds on your own account. Linked API is built for exactly that: every action runs on your own account through a human-paced cloud browser, not a blast queue, and it surfaces LinkedIn's own limit signals instead of steamrolling them. Your code receives messagingNotAllowed when you are not connected or messaging is restricted, noteLimitExceeded when a free account runs out of personalized invitation notes, and requestNotAllowed when you approach LinkedIn's request limits – so you can back off automatically. It works within our safety model, and it returns profile, company, and post data – not emails or phone numbers.
When a no-code tool is the better choice
Code is not always the answer. If you want a point-and-click campaign builder, a visual sequence editor, and a shared team inbox – and you never want to touch an SDK – a no-code tool (the Dripify / HeyReach / Waalaxy class) will get you live faster. Those products are a good fit when the standard "connect, then follow up on a schedule" campaign is all you need and a closed UI is acceptable.
Linked API is the better choice when you want messaging as a primitive inside your own stack: triggered by events in your CRM, branched on your own logic, wrapped in your product, or driven by an AI agent. You trade a visual builder for full control and embeddability. Start from the installation guide and the CLI quickstart. And messaging is only one lane of automation – publishing content on a schedule is its own, covered in How to Automate LinkedIn Posts.
Frequently Asked Questions (FAQ)
Yes, for standard direct messages – but not with a native LinkedIn feature. LinkedIn only offers scheduled outbound in its paid Recruiter products; everyday Messaging has none. Automating standard outreach means using a tool or an API, like Linked API, that performs the actions on your own account.
Yes, but not one most developers can reach. LinkedIn's official Messages API creates messages to first-degree connections or replies in an existing thread, and its documentation restricts usage "to approved partners, subject to limitations via API agreement". Approval alone would not buy automation either: LinkedIn requires each message to follow "a specific member action" and states that those "do not include an automated or scheduled event". Pages messaging is a separate integration again, covering a Company Page's inbox rather than your personal DMs. Sending and reading messages programmatically on your own account means an account-level API such as Linked API.
Any automation carries some risk, and how you use it decides how much. Aggressive volume and speed are what push accounts toward restriction, so the safer approach is to stay well within LinkedIn's limits and keep a human pace. Linked API runs each action on your own account through a human-paced cloud browser and surfaces LinkedIn's own limit signals – messagingNotAllowed, noteLimitExceeded, requestNotAllowed – so your code can back off before it hits a wall.
Not for standard direct messages – LinkedIn has no native scheduler for them. LinkedIn Recruiter and Recruiter Lite can schedule initial InMail, and Recruiter can schedule one automated follow-up, but that is a paid recruiting feature. For everything else you schedule the send in your own code or in a third-party tool.
There is no safe "blast to thousands" button, and trying to fake one is how accounts get restricted. The scalable-but-safe approach is to loop over your list programmatically and send each message on your own account at a human pace, respecting LinkedIn's limits – which is exactly what the flow above does.
Yes, two ways. Send a connection request and message them once they accept (a standard 1st-degree message), or send a Sales Navigator InMail with nvSendMessage, which reaches a non-connection directly but needs a Sales Navigator seat and a subject line.
LinkedIn publishes no exact cap. Third-party trackers put safe connection requests around 20-40 a day, and direct messages around 30-60 a day, per ZELIQ's 2026 guide; PhantomBuster, as of July 2026, cites nearer 100 messages a week on a free account. They are unofficial and move with your account standing, so treat them as guardrails and stay comfortably under them. See our connection limit guide for detail.
You can send messages and connection requests on a free LinkedIn account, but free accounts hit tighter limits – for example, a capped number of personalized invitation notes (Linked API returns noteLimitExceeded when you reach it). Automation tools and APIs are paid products; Linked API starts at $49/mo (Core, billed annually), flat per seat.
Yes. Turn on whole-inbox monitoring once with syncInbox (or nvSyncInbox for the Sales Navigator inbox), then pollInbox returns every new message across all your conversations, each tagged with the hashed personHashedUrl to reply to, a personPublicUrl that carries the public profile URL once that person has been resolved, and a sender of us or them – so you can route, tag, or reply to incoming messages in code. Enabling only switches monitoring on; the messages are picked up afterwards by a sync that runs periodically. Prefer push over polling? Subscribe to inbox webhook events. On the CLI it is linkedin inbox sync once, then linkedin inbox get.
A cloud setup is generally the safer of the two: it runs independently of your own machine and browser session, at a controlled pace. A Chrome extension only runs while your computer and browser are on, and ties the automation directly to your everyday browsing session. An API on a cloud browser, like Linked API, gives you the cloud's consistency plus full control over pacing.
Want to run the connect-to-reply flow on your own account, inside your own stack? Start with Linked API – the same actions across the API and SDKs, CLI, MCP server, and ready-made skills, on your own account and at a human pace.